Develop Web Applications Using Eclipse and Ant
by Dr. Wenjie He
Ant is the premier build tool for Java developers, and Eclipse is the premier integrated development
environment (IDE) for Java programmers. When we develop web applications, we need efficient
tools that can help us handle all the tasks easily. Integrating Ant with Eclipse provides a good
solution for web development. This method does not rely on any web wizards in some popular IDEs,
so that the web applications developed in this way are portable to different IDEs on different
platforms.
In this tutorial, we are going to use an example
AnimalSurvey to explain the whole
procedure of web development using Eclipse and Ant.
Preparation for Web Application
1. Downloading Database Software
In this example, we are going to use a simple Java database management system HSQLDB, which is a good
open source software package for web development. It is easy to set up and sufficient for most of the
problems.
- Go to the HSQLDB home page http://hsqldb.org/ to download
the latest version 1.8.0.10 zip file
hsqldb_1_8_0_10.zip.
- Unzip hsqldb_1_8_0_10.zip and extract to the directory
C:\JavaEE\DBMS. Then our HSQLDB installation directory is
C:\JavaEE\DBMS\hsqldb.
2. Project Preparation in Eclipse
- Create a Java project called AnimalSurvey in Eclipse.
- Create a folder called war in the project AnimalSurvey.
Right-click the AnimalSurvey project node, and select New ==> Folder.
The New Folder window pops up. Type war in the Folder Name field,
press Finish button.

- Create a folder called WEB-INF under the war node.
Right-click the war node, and select New ==> Folder.
Type WEB-INF in the Folder Name field, press Finish button.
- Create a folder called lib under the WEB-INF node.
- Create a folder called db under the AnimalSurvey node.
- Copy two library files C:\JavaEE\DBMS\hsqldb\lib\hsqldb.jar and
C:\JavaEE\Servers\Tomcat\apache-tomcat-5.5.26\common\lib\servlet-api.jar
into the folder war\WEB-INF\lib under the AnimalSurvey project node
by the drag-and-drop feature of Eclipse.
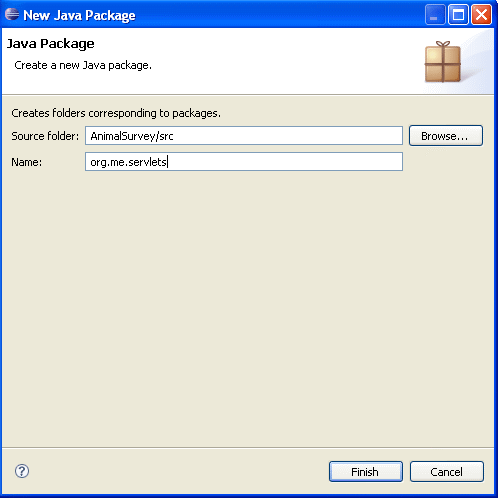
- Create a package called org.me.servlets in the AnimalSurvey project.
Right-click the AnimalSurvey node, and select New ==> Package.
The New Java Package folder pops up. Type org.me.servlets in the Name
field, press Finish button.

- Add the library file C:\JavaEE\Servers\Tomcat\apache-tomcat-5.5.26\common\lib\servlet-api.jar
to the project. (See the tutorial Develop Web Applications Using Eclipse - Manual Build
for detail.)
After the steps above, the tree structure of your project should look like the image below,

3. Creating Manager Account in Tomcat
- Open the Tomcat file C:\JavaEE\Servers\Tomcat\apache-tomcat-5.5.26\conf\tomcat-users.xml
in a text editor.
Code Listing: tomcat-users.xml (old)
  <?xml version='1.0' encoding='utf-8'?>
  <tomcat-users>
    <role rolename="tomcat"/>
    <role rolename="role1"/>
    <user username="both" password="tomcat" roles="tomcat,role1"/>
    <user username="role1" password="tomcat" roles="role1"/>
  </tomcat-users>
- Create the manager account by adding two lines in
tomcat-users.xml.
Code Listing: tomcat-users.xml (new)
  <?xml version='1.0' encoding='utf-8'?>
  <tomcat-users>
    <role rolename="manager"/>
    <role rolename="tomcat"/>
    <role rolename="role1"/>
    <user username="both" password="tomcat" roles="tomcat,role1"/>
    <user username="role1" password="tomcat" roles="role1"/>
    <user username="tomcat" password="javaee" roles="manager"/>
  </tomcat-users>
Web Application Development
Now we are ready to develop the
AnimalSurvey web application.
1. Downloading and Copying Source Files
- Download the source file AnimalSurvey.zip
and extract to a directory of your choice. We use the folder ...\AnimalSurvey to refer to
the directory that contains the source files for this project.
- Copy the file ...\AnimalSurvey\SurveyServlet.java into the package org.me.servlets
of AnimalSurvey.
- Copy the file ...\AnimalSurvey\web.xml into the folder war\WEB-INF
of AnimalSurvey.
- Copy the file ...\AnimalSurvey\Survey.html into the folder war
of AnimalSurvey.
- Copy the files ...\AnimalSurvey\hsqlserver.bat, create_table.sql, load_data.sql into the
folder db of AnimalSurvey.
- Copy the files ...\AnimalSurvey\build.xml, build.properties into the
folder of AnimalSurvey.
2. Creating Database
- Start the HSQLDB database server and create a database.
Open a command window and cd to the directory C:\JavaEE\IDEs\eclipse\workspace\AnimalSurvey\db.
At the command line, type the following command,
hsqlserver
The HSQLDB server is started. The code of hsqlserver.bat is listed below.
java -classpath ..\war\WEB-INF\lib\hsqldb.jar org.hsqldb.Server
     -database.0 file:animaldb -dbname.0 animaldb
(The two line above should be in one line. ) The database is created with alias animaldb.
- Create the table of the database. The script for the table is create_table.sql.
create table surveyresults (
	id INTEGER NOT NULL PRIMARY KEY,
	surveyoption varchar (20) NOT NULL,
	votes INTEGER NOT NULL
);
The Ant target that creates the table is,
<target name="createTables">
   <echo message="CREATE TABLES USING: ${db.driver} ${db.url}"/>
      <sql driver="${db.driver}"
           url="${db.url}"
           userid="${db.user}"
           password="${db.pw}"
           onerror="continue"
           src="db/create_table.sql">
         <classpath refid="master-classpath"/>
      </sql>
</target>
To run the Ant target createTables, right-click the build.xml node, select Run AS
==> 2. Ant Build.... The Edit Configuration window opens. Check the checkbox for
createTables and press the Run button. The table surveyresults of the database
animaldb is created.
 There is another way that can run Ant targets easier in Eclipse. Use the Ant View in Eclipse.
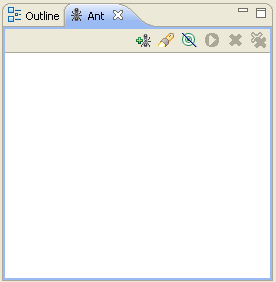
- Open the Ant View.
Select Window ==> Show View ==> Ant. A small
Ant window opens at the right hand side of the IDE.

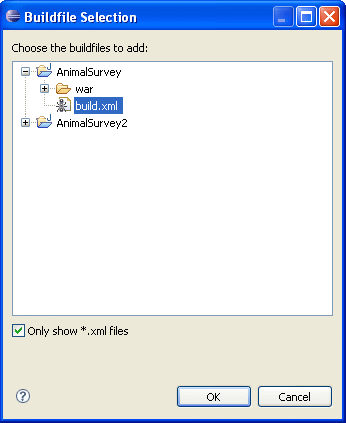
- Load build.xml into the Ant View.
Point your mouse inside the window of Ant View, right-click and select Add Buildfiles....
The Buildfile Selection window opens.
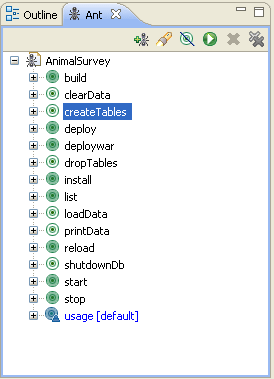
 Navigate to the build.xml in your project and press OK button to load it.
- Run the targets in the Ant View by double-clicking the targets.
 Note: The first time when you run the createTables target, you may get some error.
After you run dropTables target and then run createTables target again, it is OK.
- Populate the table surveyresults with data in the script load_data.sql. The script
of load_data.sql is listed below,
INSERT INTO surveyresults (id,surveyoption,votes) values (1, 'Dog', 3);
INSERT INTO surveyresults (id,surveyoption,votes) values (2, 'Cat', 2);
INSERT INTO surveyresults (id,surveyoption,votes) values (3, 'Bird', 5);
INSERT INTO surveyresults (id,surveyoption,votes) values (4, 'Snake', 2);
INSERT INTO surveyresults (id,surveyoption,votes) values (5, 'None', 6);
The target loadData that runs the data load is,
<target name="loadData">
   <echo message="LOAD DATA USING: ${db.driver} ${db.url}"/>
   <sql driver="${db.driver}"
        url="${db.url}"
        userid="${db.user}"
        password="${db.pw}"
        onerror="continue"
        src="db/load_data.sql">
      <classpath refid="master-classpath"/>
   </sql>
</target>
We run the loadData target as in 2 above. The data is populated into the table.
- Examine the data in the table surveyresults. The Ant target printData
that lists data in the table is,
<target name="printData">
   <echo message="PRINT DATA USING: ${db.driver} ${db.url}"/>
   <sql driver="${db.driver}"
        url="${db.url}"
        userid="${db.user}"
        password="${db.pw}"
        onerror="continue"
        print="true">
      <classpath refid="master-classpath"/>

      SELECT * FROM surveyresults;

   </sql>
</target>
We run the printData target as in 2 above.
- (Optional) If you want to delete the table, you can run the clearData target.
3. Building, Deploying, and Running Web Application
- Run the build target to build the project.
- Run the deploy target to deploy the project.
- Start Tomcat in a command window.
- Open a web browser and visit the URL
http://localhost:8080/AnimalSurvey.
4. Comments
- You do not have to run the target one by one. You can run multiple targets at the same time.
- You only need to run Tomcat once. Whenever you change the codes, such as *.java
and web.xml, you do not need to stop Tomcat. You only need to run the
reload target, which is much faster than restarting Tomcat.
- We can add new targets, such as starting the database server and running the web application
in a web browser.
Exercise
Problem: AddressBook
Create a web application that uses the source files in
AddressBook.zip using the method
discussed in this tutorial. Then run it in Tomcat and see the result.
Requirements:
- You need to create your own Ant script
build.xml.
- You may need to create two scripts for database, one for the table and one for data.
- There are no servlets in this web application. You do not need to configure JavaBeans.
Just use the given web.xml without any change.
==========The End==========


